Introduction
The phoenixNAP Bare Metal Cloud exposes a RESTful API interface which enables developers to automate the creation of bare metal servers.
To demonstrate the capabilities of the system, this article explains and provides Python code examples on how to leverage the BMC API to automate the provisioning of a Spark cluster on Bare Metal Cloud.

Prerequisites
- phoenixNAP Bare Metal Cloud account
- An OAuth access token
How to Automate the Deployment of Spark Clusters
The instructions below apply to phoenixNAP’s Bare Metal Cloud environment. The Python code examples found in this article may not work in other environments.
The steps necessary to deploy and access the Apache Spark cluster:
1. Generate an access token.
2. Create Bare Metal Cloud servers running Ubuntu OS.
3. Deploy an Apache Spark cluster on the created server instances.
4. Access Apache Spark dashboard by following the generated link.
The article highlights a subset of Python code segments which leverage the Bare Metal Cloud API and shell commands to complete the steps outlined above.
Note: The code examples found in this article are available in phoenixNAP’s GitHub BMC Spark Demo repository, where the bmc-spark.py file contains the main program flow. The script typically takes about 6 minutes to complete.
Check out the full list of phoenixNAP GitHub repos for automating Bare Metal Cloud.
Step 1: Get Access Token
Before sending requests to the BMC API, you need to obtain an OAuth access token using the client_id and client_secret registered in the BMC Portal.
To learn more about how to register for the client_id and client_secret, refer to the Bare Metal Cloud API Quick Start guide.
Below is the Python function that generates the access token for the API:
def get_access_token(client_id: str, client_secret: str) -> str:
"""Retrieves an access token from BMC auth by using the client ID and the
client Secret."""
    credentials = "%s:%s" % (client_id, client_secret)
    basic_auth = standard_b64encode(credentials.encode("utf-8"))
    response = requests.post(' https://api.phoenixnap.com/bmc/v0/servers',
        headers={
            'Content-Type': 'application/x-www-form-urlencoded',
            'Authorization': 'Basic %s' % basic_auth.decode("utf-8")},
        data={'grant_type': 'client_credentials'})

    if response.status_code != 200:
        raise Exception('Error: {}. {}'.format(response.status_code, response.json()))
    return response.json()['access_token']
Note: For in-depth documentation on the BMC API, refer to our BMC API user manual.
Step 2: Create Bare Metal Server Instances
Use POST/servers REST API calls to create bare metal server instances. For each POST/servers request specify the required parameters, such as data center location, type of server, OS, etc.
Below is the Python function that makes a call to the BMC API to create a bare metal server.
def __do_create_server(session, server):
    response = session.post('https://api.phoenixnap.com/bmc/v0/servers'),
                            data=json.dumps(server))
    if response.status_code != 200:
        print("Error creating server: {}".format(json.dumps(response.json())))
    else:
        print("{}".format(json.dumps(response.json())))
        return response.json()
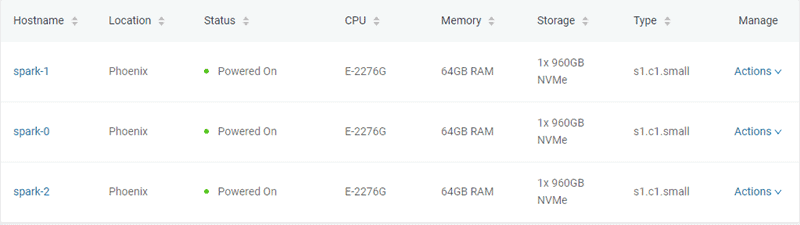
In this example, three bare metal servers of type “s1.c1.small” are created, as specified in the server-settings.conf file.
{
"ssh-key" : "ssh-rsa xxxxxx== username",
"servers_quantity" : 3,
"type" : "s1.c1.small",
"hostname" : "spark",
"description" : "spark",
"public" : True,
"location" : "PHX",
"os" : "ubuntu/bionic"
}
The expected output from the Python script that generates the token and provisions the servers is as follows:
Retrieving token

Successfully retrieved API token

Creating servers...

{
  "id": "5ee9c1b84a9ca71ea6b9b766",
  "status": "creating",
  "hostname": "spark-1",
  "description": "spark-1",
  "os": "ubuntu/bionic",
  "type": "s1.c1. small ",
  "location": "PHX",
  "cpu": "E-2276G",
  "ram": "128GB RAM",
  "storage": "2x 960GB NVMe",
  "privateIpAddresses": [
    "10.0.0.11"
  ],

  "publicIpAddresses": [
    "131.153.143.250",
    "131.153.143.251",
    "131.153.143.252",
    "131.153.143.253",
    "131.153.143.254"
  ]

}

Server created, provisioning spark-1...

{
  "id": "5ee9c1b84a9ca71ea6b9b767",
  "status": "creating",
  "hostname": "spark-0",
  "description": "spark-0",
  "os": "ubuntu/bionic",
  "type": "s1.c1.small",
  "location": "PHX",
  "cpu": "E-2276G",
  "ram": "128GB RAM",
  "storage": "2x 960GB NVMe",

  "privateIpAddresses": [
    "10.0.0.12"
  ],

  "publicIpAddresses": [
    "131.153.143.50",
    "131.153.143.51",
    "131.153.143.52",
    "131.153.143.53",
    "131.153.143.54"
  ]
}

Server created, provisioning spark-0...

{
  "id": "5ee9c1b84a9ca71ea6b9b768",
  "status": "creating",
  "hostname": "spark-2",
  "description": "spark-2",
  "os": "ubuntu/bionic",
  "type": "s1.c1. small ",
  "location": "PHX",
  "cpu": "E-2276G",
  "ram": "128GB RAM",
  "storage": "2x 960GB NVMe",

  "privateIpAddresses": [
    "10.0.0.13"
  ],

  "publicIpAddresses": [
    "131.153.142.234",
    "131.153.142.235",
    "131.153.142.236",
    "131.153.142.237",
    "131.153.142.238"
  ]
}

Server created, provisioning spark-2...

Waiting for servers to be provisioned...
Once it creates the three bare metal servers, the script communicates with the BMC API to check server status until provisioning is completed and the servers are powered on.
Note: To learn more about Bare Metal Cloud, see Introduction to Bare Metal Cloud.
Step 3: Provision Apache Spark Cluster
Once the servers are provisioned, the Python script establishes an SSH connection using the servers’ public IP address. Next, the script installs Spark on the Ubuntu servers. That includes installing JDK, Scala, Git and Spark on all servers.
To start the process, execute the all_hosts.sh file on all servers. The script provides download and installation instructions as well as the environment configuration needed to prepare the cluster for use.
Apache Spark includes scripts which configure the servers as master and worker nodes. The only constraint in configuring a worker node is to already have the master node configured. The first server to be provisioned is assigned as the Spark Master node.
The following Python function performs that task:
def wait_server_ready(function_scheduler, server_data):
    json_server = bmc_api.get_server(REQUEST, server_data['id'])
    if json_server['status'] == "creating":
        main_scheduler.enter(2, 1, wait_server_ready, (function_scheduler, server_data))
    elif json_server['status'] == "powered-on" and not data['has_a_master_server']:
        server_data['status'] = json_server['status']
        server_data['master'] = True
        server_data['joined'] = True
        data['has_a_master_server'] = True
        data['master_ip'] = json_server['publicIpAddresses'][0]
        data['master_hostname'] = json_server['hostname']
        print("ASSIGNED MASTER SERVER: {}".format(data['master_hostname']))
Execute the master_host.sh file to configure the first server as the Master node. See below the content of the master_host.sh file:
#!/bin/bash
echo "Setting up master node"
/opt/spark/sbin/start-master.sh
Once the master node is assigned and configured, the other two nodes are added to the Spark cluster.
See below the content of the worker_host.sh file:
#!/bin/bash
echo "Setting up master node on /etc/hosts"
echo "$1 $2 $2" | sudo tee -a /etc/hosts
echo "Starting worker node"
echo "Joining worker node to the cluster"
/opt/spark/sbin/start-slave.sh spark://$2:7077
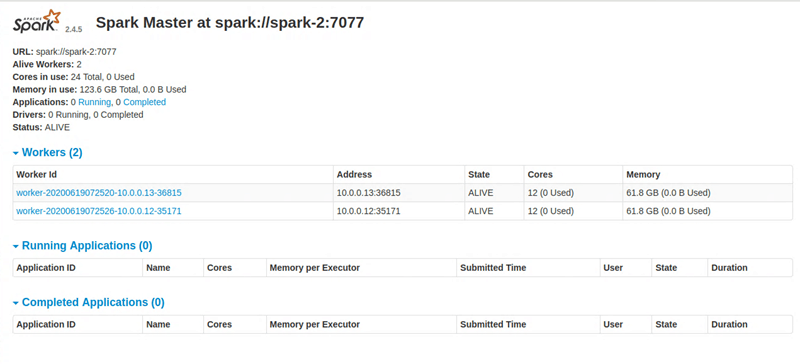
The provisioning of an Apache Spark cluster is completed. Below is the expected output from the Python script:
ASSIGNED MASTER SERVER: spark-2
Running all_host.sh script on spark-2 (Public IP: 131.153.142.234)

Setting up /etc/hosts
Installing jdk, scala and git
Downloading spark-2.4.5
Unzipping spark-2.4.5
Setting up environment variables

Running master_host.sh script on spark-2 (Public IP: 131.153.142.234)
Setting up master node
starting org.apache.spark.deploy.master.Master, logging to /opt/spark/logs/spark-ubuntu-org.apache.spark.deploy.master.Master-1-spark-2.out

Master host installed
Running all_host.sh script on spark-0 (Public IP: 131.153.143.170)

Setting up /etc/hosts
Installing jdk, scala and git
Downloading spark-2.4.5
Unzipping spark-2.4.5
Setting up environment variables

Running all_host.sh script on spark-1 (Public IP: 131.153.143.50)

Setting up /etc/hosts
Installing jdk, scala and git
Downloading spark-2.4.5
Unzipping spark-2.4.5
Setting up environment variables

Running slave_host.sh script on spark-0 (Public IP: 131.153.143.170)
Setting up master node on /etc/hosts
10.0.0.12 spark-2 spark-2
Starting worker node
Joining worker node to the cluster
starting org.apache.spark.deploy.worker.Worker, logging to /opt/spark/logs/spark-ubuntu-org.apache.spark.deploy.worker.Worker-1-spark-0.out

Running slave_host.sh script on spark-1 (Public IP: 131.153.143.50)
Setting up master node on /etc/hosts
10.0.0.12 spark-2 spark-2
Starting worker node
Joining worker node to the cluster
starting org.apache.spark.deploy.worker.Worker, logging to /opt/spark/logs/spark-ubuntu-org.apache.spark.deploy.worker.Worker-1-spark-1.out

Setup servers done
Master node UI: http://131.153.142.234:8080
Note: Do you know the differences between Apache Hadoop and Apache Spark? If not, read our article Hadoop vs Spark.
Step 4: Access Apache Spark Dashboard
Upon executing all instructions, the Python script provides a link to access the Apache Spark dashboard.
Conclusion
This article has helped you automate the deployment of Spark clusters on Bare Metal Cloud servers. Now you can easily scale up your resources whenever necessary and power your Big Data analysis workflows.
Seow Lim assisted in writing this article.
