Introduction
SELinux is a mandatory access control (MAC) enforcer built into the Linux kernel. It limits the privileges of individual services whose vulnerabilities might be a threat to the system.
CentOS systems without SELinux rely on the configuration of all its privileged software applications. A single misconfiguration may compromise the entire system. By following this guide, you will learn how to disable SELinux on CentOS 7.
Why Disable SELinux?
Not all applications support SELinux. Therefore, SELinux can terminate necessary processes during the regular use and installation of software packages. In those cases, we advise you to turn off this service.
Prerequisites
- Access to a user account with sudo privileges
- Access to a terminal/command line
- An RHEL-based system, such as CentOS 7
- A text editor, such as nano or vim
Steps for Disabling SELinux on CentOS
Step 1: Check SELinux Status
The SELinux service is enabled by default on CentOS and most other RHEL-based systems. However, this might not be the case for your system.
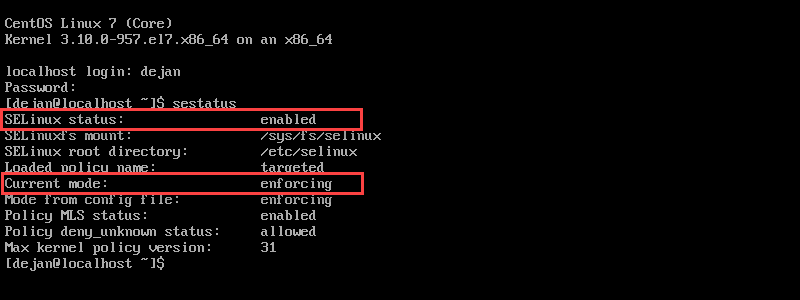
Start by checking the status of SELinux on your system with the command:
sestatus The example output below indicates that SELinux is enabled. The status shows the service is in the enforcing mode.
SELinux may prevent the normal functioning of applications. The service denies access if:
- A file is mislabeled.
- An incompatible application attempts to access a forbidden file.
- A service is running under the incorrect security policy.
- An intrusion is detected.
If you notice that services are not running correctly, check SELinux log files. The logs are in /var/log/audit/audit.log. Most common log messages are labeled with “AVC.” If you can’t find any logs, try looking in /var/log/messages. The system writes logs in that file if the auditd daemon is not running.
Step 2: Disable SELinux
Option 1: Disable SELinux Temporarily
To disable SELinux temporarily, type in the following command in the terminal:
sudo setenforce 0In sudo setenforce 0, you can use permissive instead of 0.
This command changes SELinux mode from targeted to permissive.

In permissive mode, the service is active and audits all actions. However, it does not enforce any security policies. The system logs AVC messages.
The change is only active until the next reboot. To turn off SELinux permanently, refer to the next section of the article.
Option 2: Disable SELinux Permanently
To disable the service permanently, use a text editor (e.g., vim or nano) and edit the /etc/sysconfig/selinux file as instructed below.
1. Open the /etc/sysconfig/selinux file. We will be using vim. If you are unfamiliar with text editors, refer to our instructional guide on how to save and exit a file vim.
Enter the following command to open the file:
sudo vi /etc/sysconfig/selinux2. Change the SELINUX=enforcing directive to SELINUX=disabled.
3. Save the edited file.
Reboot CentOS to Save Changes
For the change to take effect, you need to reboot the system with the command:
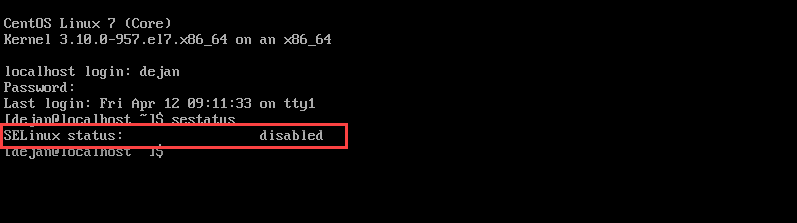
sudo shutdown -r nowAfter you reboot, check the service status to confirm SELinux is disabled. Use the command:
sestatusThe status should be disabled, as seen in the image above. The system will not load any SELinux policies or write any AVC logs.
Conclusion
By following this article, you should be able to check SELinux status and disable the service on CentOS 7. Be cautious when permanently disabling SELinux. In general, the advised option is to switch to permissive mode.
To read more about SELinux, please refer to the official CentOS Wiki.
